How I Host My Next.js Websites on Cloudflare Pages for Free
Discover how to deploy Next.js applications on Cloudflare Pages with GitHub CI/CD - completely free hosting that actually works for real projects.
I've been hosting my Next.js projects on Cloudflare Pages for over a year now, and I'm genuinely surprised more developers don't know about this option. It's not just "free hosting" - it's actually good hosting that happens to be free. No catch, no hidden fees, just solid infrastructure.
The "Free Hosting" Problem
Let me be honest - I was skeptical about free hosting. I'd tried many hosting providers. They all had limitations that made them feel like "starter plans" rather than real hosting solutions.
But Cloudflare Pages is different. Here's what sold me:
The deployment process is stupid simple: Push to GitHub → Cloudflare automatically builds and deploys (Similar to Vercel and other platforms). No config files, no complex CI/CD setup.
The performance is impressive: We're talking about Cloudflare's global CDN. The same infrastructure that powers millions of websites.
The limits are generous: UNLIMITED BANDWIDTH. (At least for the time of writing this article.)
What "Forever Free" Actually Means
Here's my real hosting costs after running multiple Next.js projects on Cloudflare Pages:
| Service | Monthly Cost | Annual Cost |
|---|---|---|
| Cloudflare Pages | $0 | $0 |
| Two domains (.com) | ~$2 | ~$20 |
| SSL Certificate | $0 | $0 |
| CDN & Bandwidth | $0 | $0 |
| Total | ~$2 | ~$20 |
Compare that to traditional hosting where you're looking at $5-20/month minimum. Over a year, that's $60-240 vs ~$10 for just the domain.
Setup
Next.js Configuration for Static Export
The magic happens in your next.config.js. Here's the exact config I use:
/** @type {import('next').NextConfig} */
const nextConfig = {
  output: 'export',
  trailingSlash: true,
  images: {
    unoptimized: true,
  },
  distDir: 'out',
};

export default nextConfig;
That's it. A few lines of config and you're ready for static deployment.
Why these settings matter:
output: 'export' - Tells Next.js to generate static files instead of server-side renderingtrailingSlash: true - Ensures proper routing on static hostsimages: { unoptimized: true } - Disables Next.js image optimizationdistDir: 'out' - Specifies where the built files go (Cloudflare looks for this)GitHub/GitLab Integration: The Real CI/CD Magic
Here's where it gets interesting. You don't need to configure any CI/CD pipelines. At all.
No GitHub Actions config, no complex workflows, no configuration files.
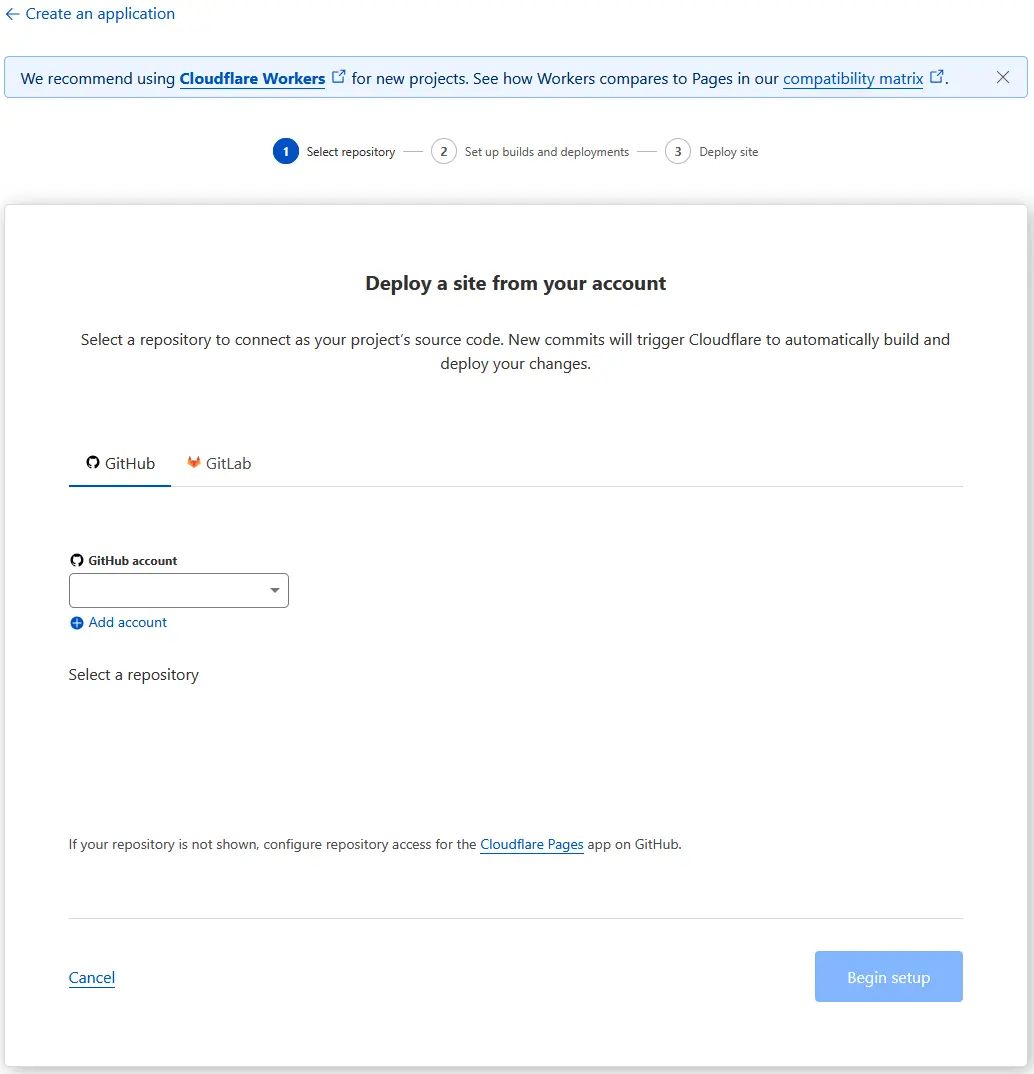
Cloudflare Pages CI/CD setup screen with GitHub integration
What Projects Work Best
I've deployed several types of projects on this setup:
Perfect for:
Not ideal for:
But honestly? Most frontend projects fit the "perfect for" category.
Step-by-Step: My Actual Deployment Process
1. Setting Up the Project
Starting with a fresh Next.js project:
npx create-next-app@latest my-project
cd my-project
Add the static export config to next.config.js:
/** @type {import('next').NextConfig} */
const nextConfig = {
  output: 'export',
  trailingSlash: true,
  images: { unoptimized: true },
  distDir: 'out',
};

export default nextConfig;
2. Connecting to Cloudflare Pages
This is where it gets surprisingly simple:
npx next buildout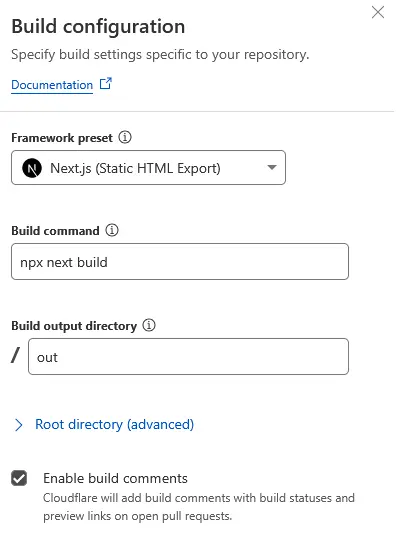
Cloudflare Pages build configuration form
That's it. No Docker files, no complex CI/CD configs, no environment variables to manage.
3. The Deployment Flow
Here's what happens every time you push code:
git push origin main
    ↓
GitHub webhook triggers Cloudflare
    ↓
Cloudflare clones your repo (freshest git commit)
    ↓
Runs npm install && npm run build
    ↓
Deploys to global CDN
    ↓
Your site is live in ~2 minutes
The best part? Preview deployments for every branch and pull request. Push a feature branch, get a unique URL to share with clients or teammates.
Real-World Performance and Gotchas
Performance That Surprised Me
I ran some tests comparing my Cloudflare Pages deployment to other hosting options:
My Static Site on Cloudflare:
Traditional hosting I tested:
The consistency across different locations impressed me most. Poznań, Tokyo, New York, London - all perform similarly.
Common Gotchas and Solutions
Image optimization: Next.js image optimization doesn't work with static export. Use images: { unoptimized: true } and handle image optimization manually or use external services.
Dynamic imports: Be careful with dynamic imports. They work, but you need to ensure all dependencies are included in the build.
Environment variables: Build-time environment variables work fine, but remember there's no server-side runtime.
API routes: Don't work with static export. Use Cloudflare Workers or external APIs instead.
Custom Domains and SSL
Setting up a custom domain is straightforward:
The whole process takes about 5 minutes, and SSL is free and automatic.
Why This Actually Matters
The Problem with Traditional Hosting
I've been burned by traditional hosting before. Here's what usually happens:
And all of that only for a simple website with no backend logic.
With static hosting on Cloudflare Pages, I skip all of these problems. The site loads fast everywhere, never goes down, and costs nothing to run.
Real Projects I've Deployed
Here are some actual projects I'm running on this setup:
Personal portfolio + blog: hubertkasperek.com - My main portfolio site with integrated blog at hubertkasperek.com/blog. Pure static Next.js with MDX blog posts.
Micro SaaS project: BlitzyApp.com - A no-code platform for rapid idea validation. Uses Cloudflare Pages for the frontend and Cloudflare Workers for the backend API. This shows how you can extend the free tier with serverless functions.
School hackathon project: AssistlyApp - Educational app built during a hackathon. Also uses Cloudflare Pages + Workers for the backend functionality.
Client demos: Preview sites for client work - each gets its own repository and deployment
All of these run on the same free tier, perform well, and deploy automatically when I push code.
The "Catch" That Isn't Really a Catch
People always ask: "What's the catch?" The limitations are real but manageable:
For 90% of developer portfolios and marketing sites, these limitations don't matter.
My Recommendation
When to Use This Setup
Perfect for:
Skip this for:
Getting Started
If you want to try this, here's my suggestion:
The whole process can take about 30 minutes for a basic site, and you'll have a good sense of whether this approach works for your needs.
Summary
I've been running multiple projects on Cloudflare Pages for over a year now, and I'm genuinely impressed with the reliability and performance. The free tier is generous enough for real projects, the deployment process is seamless, and the global CDN performance is excellent.
Is it perfect? Not for every use case. But for developer portfolios, documentation sites, and frontend projects, it's hard to beat free hosting that works well.
The biggest benefit is not only the cost savings - it's also the simplicity. Push code, get deployment. No server management, no uptime monitoring, no surprise bills. Just focus on building your projects.
Want to try it yourself? Start with a simple Next.js project and see how it performs. You might be surprised by how well this "free" hosting works.